Face Tracking
Face tracking using a webcam and iPhone
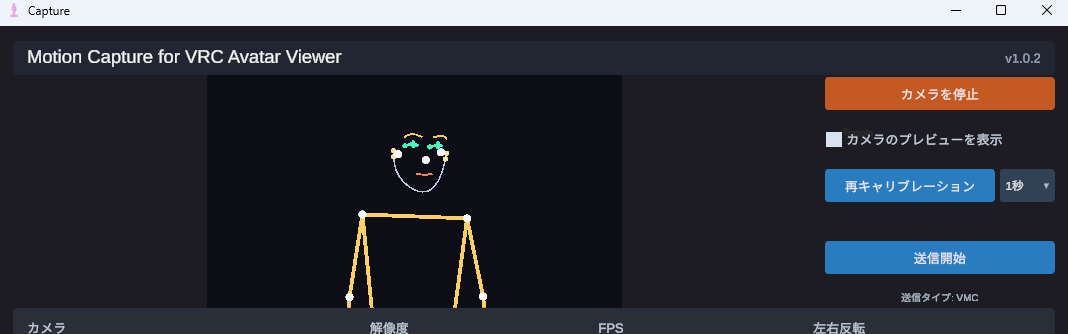
Motion Capture for VRC Avatar Viewer (hereinafter "Capture App") allows you to reflect facial expressions such as blinking and mouth movements on your avatar. You select both the acquisition method for facial expression data and the sending format to the avatar.
2 Data Sources (Acquisition Methods)
- Webcam (default) Estimates facial expressions from video of a webcam connected to your PC. No additional equipment is required and anyone can use it, but there are limitations such as being unable to capture cheek puffs or tongue movements.
- iPhone (iFacialMocap) Using a Face ID-compatible iPhone and iFacialMocap (paid iOS app), you can obtain 52 types of high-precision facial expression data based on ARKit. This offers significantly greater expressiveness than a webcam.
Which format to send the acquired facial expression data to the avatar in is selected in "Facial Expression Sending Format". First check the avatar's supported formats, then select the format that matches it (see details in Step 3 onwards).
- When iFacialMocap is connected, iFacialMocap's facial expression data takes priority over the webcam (body movements remain from the webcam)
- Regardless of the sending format, if iFacialMocap is enabled, its facial expression data will be used
- For details on VRChat integration, see the Face Tracking in VRChat guide
Capture Facial Expressions with Webcam
This is the default method. If you start the camera following the steps in the Streaming Mode Guide, facial expressions will be automatically estimated from your webcam. No additional configuration is required.
1-1. Facial Expressions You Can Capture
- Blinking (each eye separately)
- Vowels (a, i, u, e, o)
- Gaze (up, down, left, right)
- Eyebrow up/down, mouth opening/closing, mouth corner movements, etc.
1-2. Facial Expressions You Cannot Capture / Have Difficulty With
- Cheek puffs, tongue movements
- Accuracy significantly decreases in dark environments. Sufficient brightness for a clear view of the face is needed
- Angles where the front of the face is not visible, such as profile or downward looking
- When using a webcam alone, VRM Standard is recommended. It will move naturally on most avatars
- Perfect Sync and VRCFT also work. However, as mentioned above, there are movements that cannot be captured.
Capture High-Precision Facial Expressions with iPhone (iFacialMocap)
Using a Face ID-compatible iPhone (iPhone X or later), you can significantly improve facial expression accuracy compared to a webcam. You will need an iOS app called iFacialMocap.
2-1. What You Need
- A Face ID-compatible iPhone or iPad Pro
- iFacialMocap purchased from the App Store (paid iOS app)
- Your iPhone and PC must be connected to the same Wi-Fi (LAN)
2-2. iPhone Side Setup
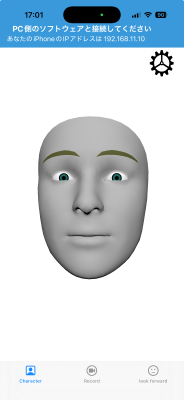
- Launch iFacialMocap on your iPhone
- The screen displays "Please connect with the PC software" and shows an IP address (e.g.,
192.168.1.10) that you should note down
- Open iFacialMocap's settings and check "Destination Settings". If a value is entered in "Destination IP Address", it will not be displayed. Press the "Reset Destination Settings" button below it and restart the app.
2-3. Capture App Side Setup
- Enter the iPhone's IP address you noted down in the "iFacialMocap IP Address" field in the Capture App
- Turn ON "Use iFacialMocap"
- When the status on the right becomes "Receiving", the connection is successful
2-4. Status Display Meanings
| Status | Meaning |
|---|---|
| Stopped | The "Use iFacialMocap" toggle is OFF |
| IP Not Entered | The iPhone's IP is blank. When you enter it, it will automatically attempt to connect |
| Awaiting Connection | Handshake was sent but no response from iPhone (iFacialMocap not running / wrong IP / different network, etc.) |
| Receiving | Facial expression data is being received normally |
2-5. Facial Expressions You Can Capture
You can capture 52 types of ARKit-based blend shapes + head rotation + left/right gaze. This includes cheek puffs and tongue movements that cannot be captured with a webcam (the avatar must have these blend shapes).
- While iFacialMocap is enabled, body, arm, and finger movements will continue to be captured from the webcam
- This is a hybrid configuration of "facial expressions from iFacialMocap, body from webcam"
Check Which Face Tracking Formats Your Avatar Supports
Before selecting the facial expression sending format, check on the Viewer app side which face tracking format the currently displayed avatar supports. If you select an unsupported format, the facial expression data sent from the Capture App will not move the avatar correctly.

- Display the target avatar in the Viewer app
- Turn ON Streaming mode
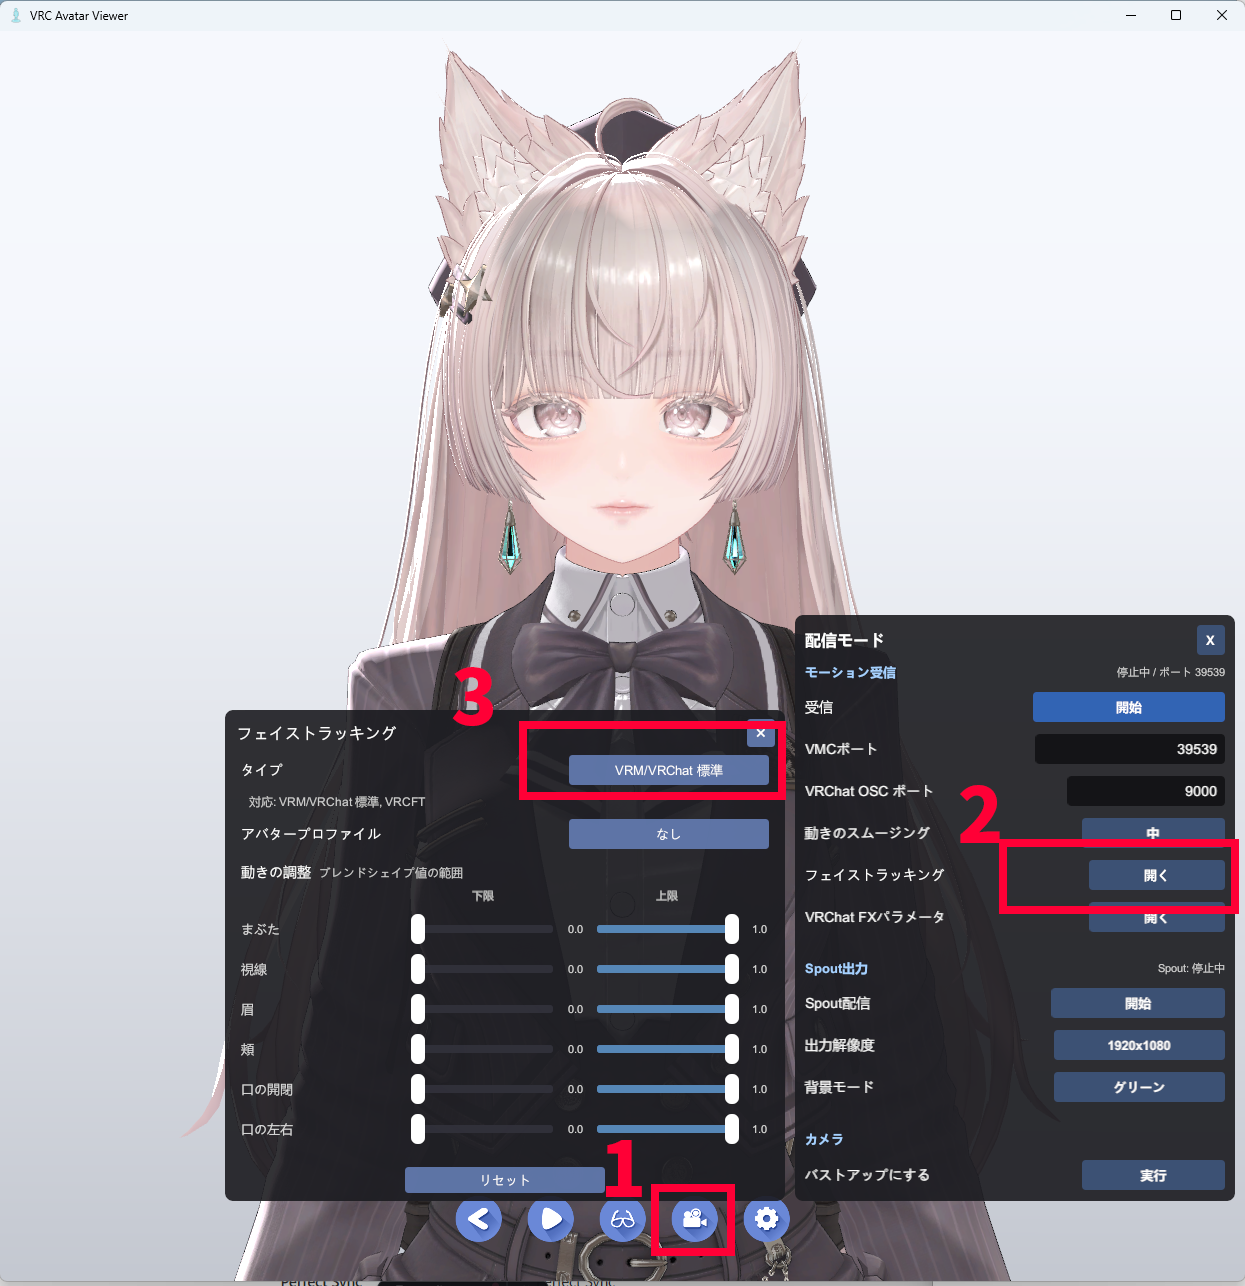
- Click the "Face Tracking" button in the streaming panel
- Check the "Supported:" display below the "Type" button at the top of the window
- The display shows "Supported: VRM/VRChat Standard, Perfect Sync", for example, which formats the currently loaded avatar supports
- The "Facial Expression Sending Format" on the Capture App side and the "Type" on the Viewer side should both be set to the same format from within these supported formats
- If you select an unsupported format, facial expressions may not move, or only some blend shapes may be reflected
Select Facial Expression Sending Format (Blend Shape Standard)
Based on the avatar's supported format confirmed in Step 3, select from the "Facial Expression Sending Format" dropdown in the Capture App.
VRM Standard
Sends basic facial expressions (blinking, vowels, gaze, etc.) that VRM inherently has via VMC. It works on any avatar but the expression is simple. Eyes and mouth also work on VRChat avatars. This is the default recommendation when using a webcam alone.
Perfect Sync
Sends the 52 types of ARKit blend shapes via VMC. On avatars supporting Perfect Sync, subtle movements of mouth corners, eyebrows, and eyelids are reflected. It is particularly effective when combined with iFacialMocap.
VRCFT
VRCFaceTracking 5.x Unified Expressions standard. The characteristic feature is that it can reproduce the same facial expressions as avatars within VRChat.
- VRCFT basically requires adding a specialized addon to the avatar. Perfect Sync can be used on both VRChat avatars and VRM avatars if they support it.
Turn ON Facial Expression Transmission
Turn ON "Facial Expressions" in the sending parts of the Capture App. If it is already ON, you can leave it as is.

Select the Face Tracking Type on the Viewer App Side
From the supported formats confirmed in Step 3, select the same "Type" on the Viewer app side as the "Facial Expression Sending Format" selected on the Capture App side. The Viewer side type is switched from the window opened by Streaming Mode toolbar → "Face Tracking" button.
5-1. Open the Window
- Display the avatar in the Viewer app
- Turn ON Streaming mode
- Click the "Face Tracking" button in the streaming panel
5-2. Switch Type
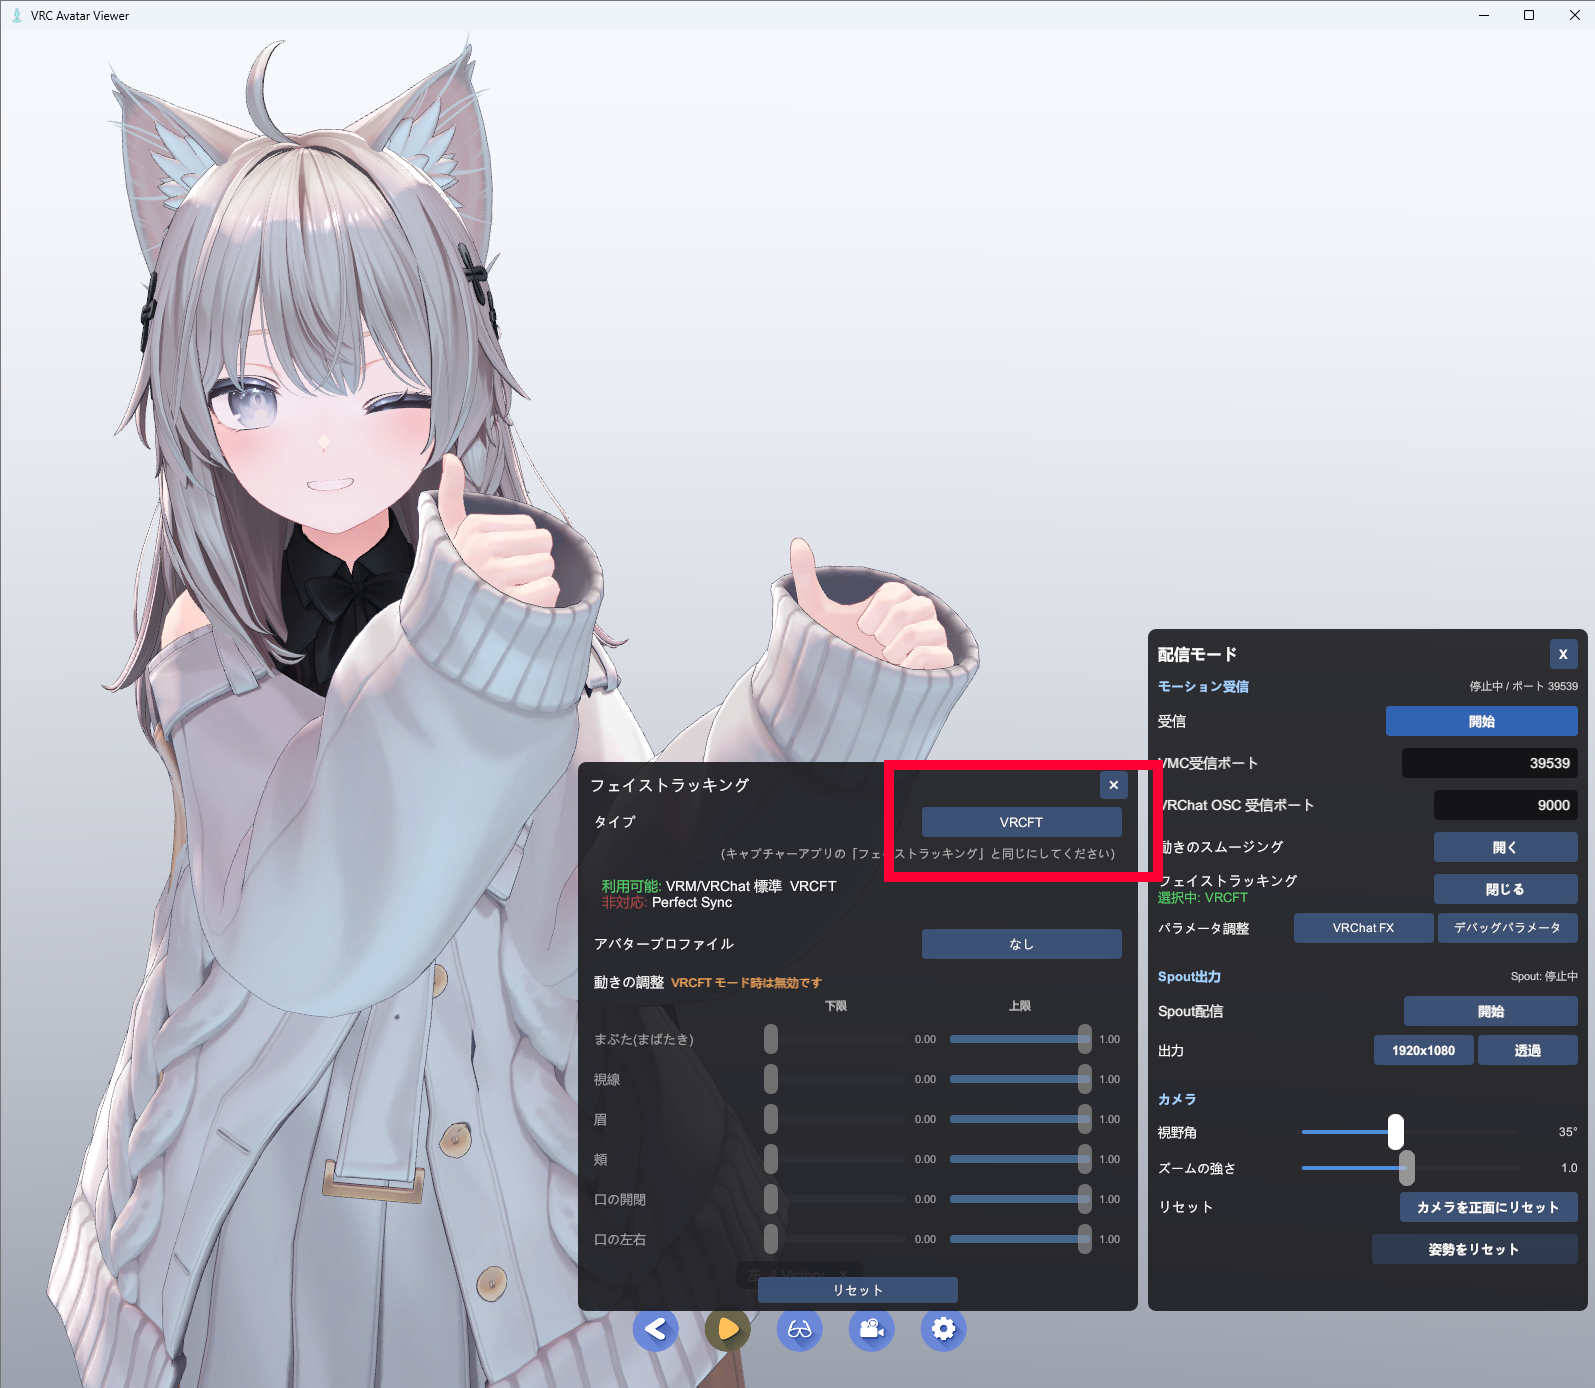
Each time you click the "Type" button at the top of the window, it switches in this order: VRM/VRChat Standard → Perfect Sync → VRCFT. Match this with the selection on the Capture App side.
| Viewer Side "Type" | Capture App Side "Facial Expression Sending Format" |
|---|---|
| VRM/VRChat Standard | VRM Standard |
| Perfect Sync | Perfect Sync |
| VRCFT | VRCFT |
5-3. Important Notes
- While VRCFT is selected, the category-based facial expression intensity sliders are disabled: VRCFT directly drives facial expression parameters via VRChat OSC, so the Viewer side's blend shape intensity adjustments will not be applied
Leave Facial Expressions to VRCFaceTracking Only
You can set up a configuration where only body motion is sent from the Capture App and facial expressions are sent from VRCFaceTracking. You can use not only iFacialMocap but also various modules that VRCFaceTracking supports.
This is basically an advanced configuration for users who understand VRCFT and face tracking devices.
VMC Protocol→ [Viewer App][iFacialMocap] → [VRCFaceTracking] →
VRChat OSC→ [Viewer App]
Division of Responsibilities
| Responsible For | Transmission Route | Content Being Sent |
|---|---|---|
| Motion System | VMC Protocol | Body, head, arms, hands, and other postures |
| Facial Expression Transmission System | VRChat OSC | Blinking, mouth, eyebrows, gaze, and other face tracking |
Steps
- Start motion transmission normally in the Capture App
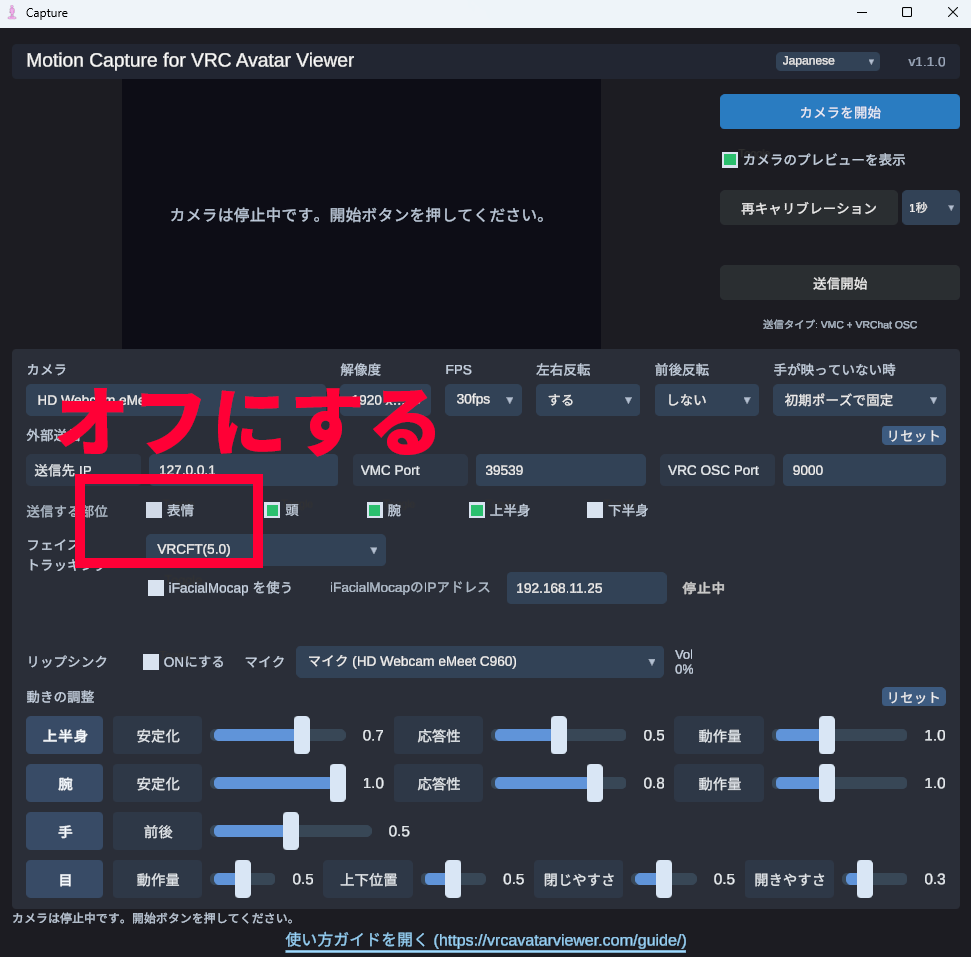
- Turn OFF facial expression transmission in the Capture App
- Launch VRCFaceTracking and connect iFacialMocap on the VRCFaceTracking side
- Switch the face tracking type on the Viewer app side to VRCFT and turn ON receiving
- Confirm that VRCFaceTracking recognizes the Viewer app as the connection destination and that the avatar's facial expressions move on the Viewer
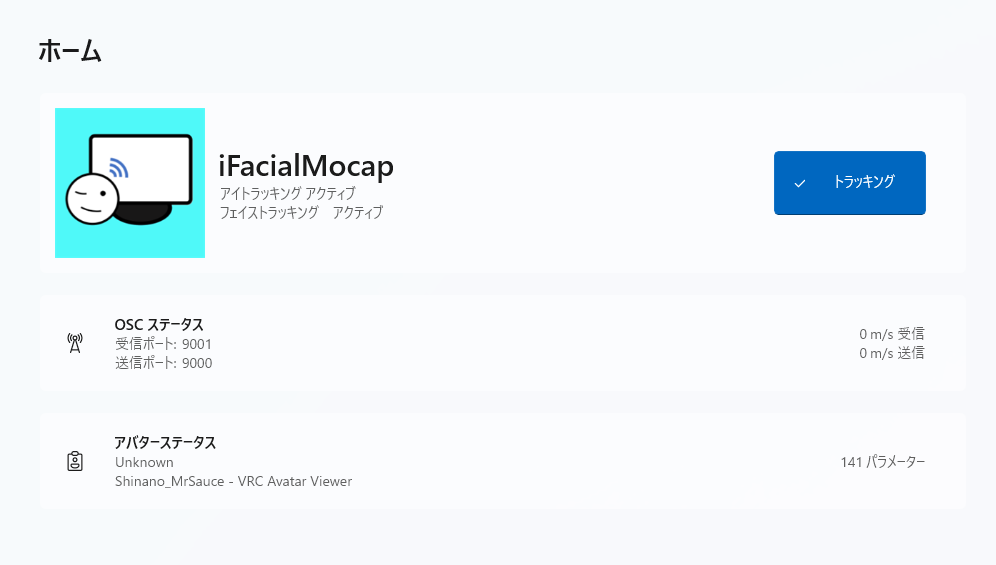
- Make sure VRCFaceTracking is capable of tracking, and then put the Viewer app in receiving mode. The order is important.
- If OSCQuery cannot be exchanged between VRCFaceTracking and the Viewer app, the avatar will not move. The Viewer app exchanges it when "Receiving" from streaming mode. If VRCFaceTracking is not in tracking mode at this time, the exchange cannot be performed.
- Turn OFF facial expression transmission in the Capture App to avoid double application of facial expressions from VMC and VRChat OSC. Body motion transmission can remain ON
- You must switch the Viewer app side to VRCFT, otherwise you cannot receive facial expression parameters from VRChat OSC from VRCFaceTracking
- For detailed connection confirmation between VRCFaceTracking and Viewer app, see the VRCFaceTracking Integration guide