Move Your Avatar (Capture App)
Move your avatar with a webcam and motion capture
By combining the VRC Avatar Viewer and Motion Capture for VRC Avatar Viewer (hereinafter "Capture App"), you can reflect movements from a webcam or iPhone (iFacialMocap) onto your avatar. You can also use it for streaming with OBS Studio and other tools. This guide will walk you through the setup in the following steps.
The Capture App processes camera video and data received from iFacialMocap entirely on your PC. It does not communicate with anything outside your PC, except for the VMC and VRChat OSC transmissions you explicitly start.
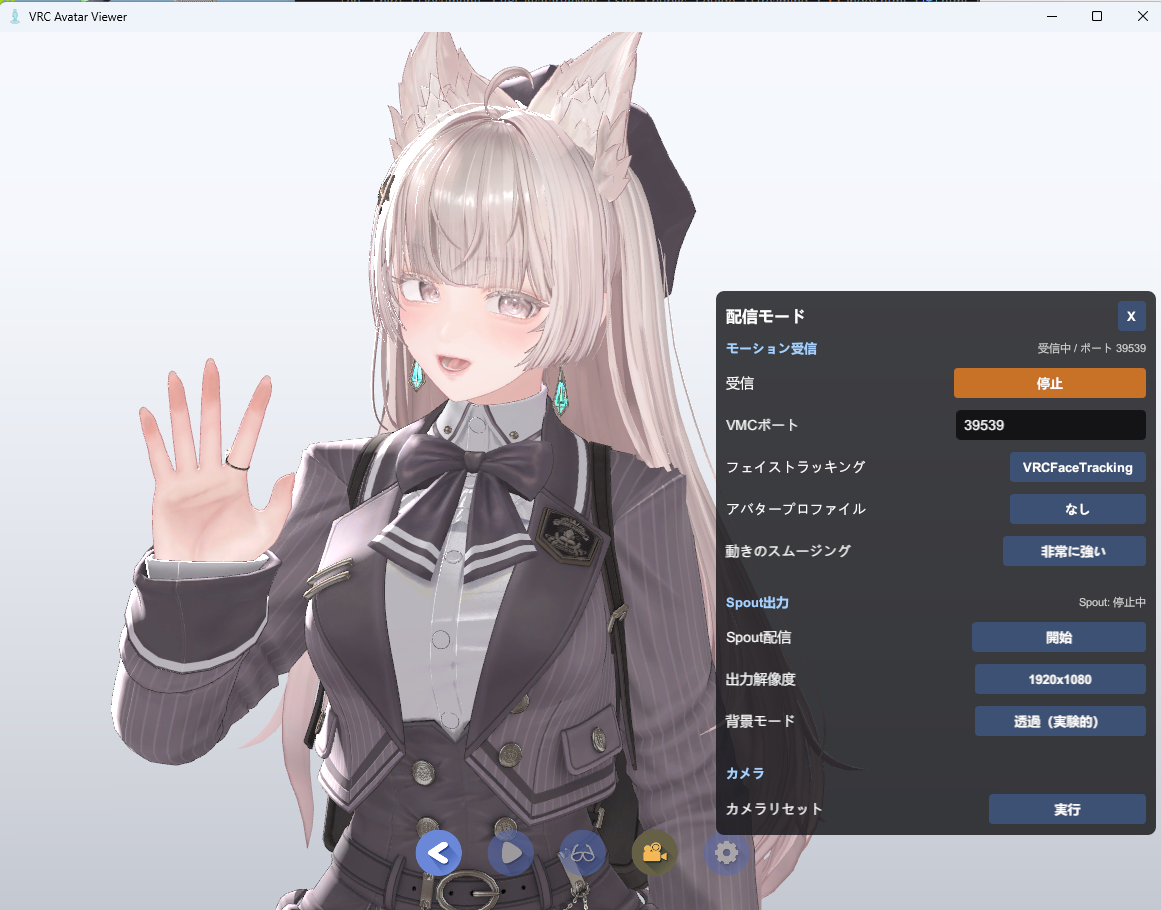
- Track your movements and facial expressions with the Capture App
- Send them to the Avatar Viewer via VMC protocol to animate your avatar
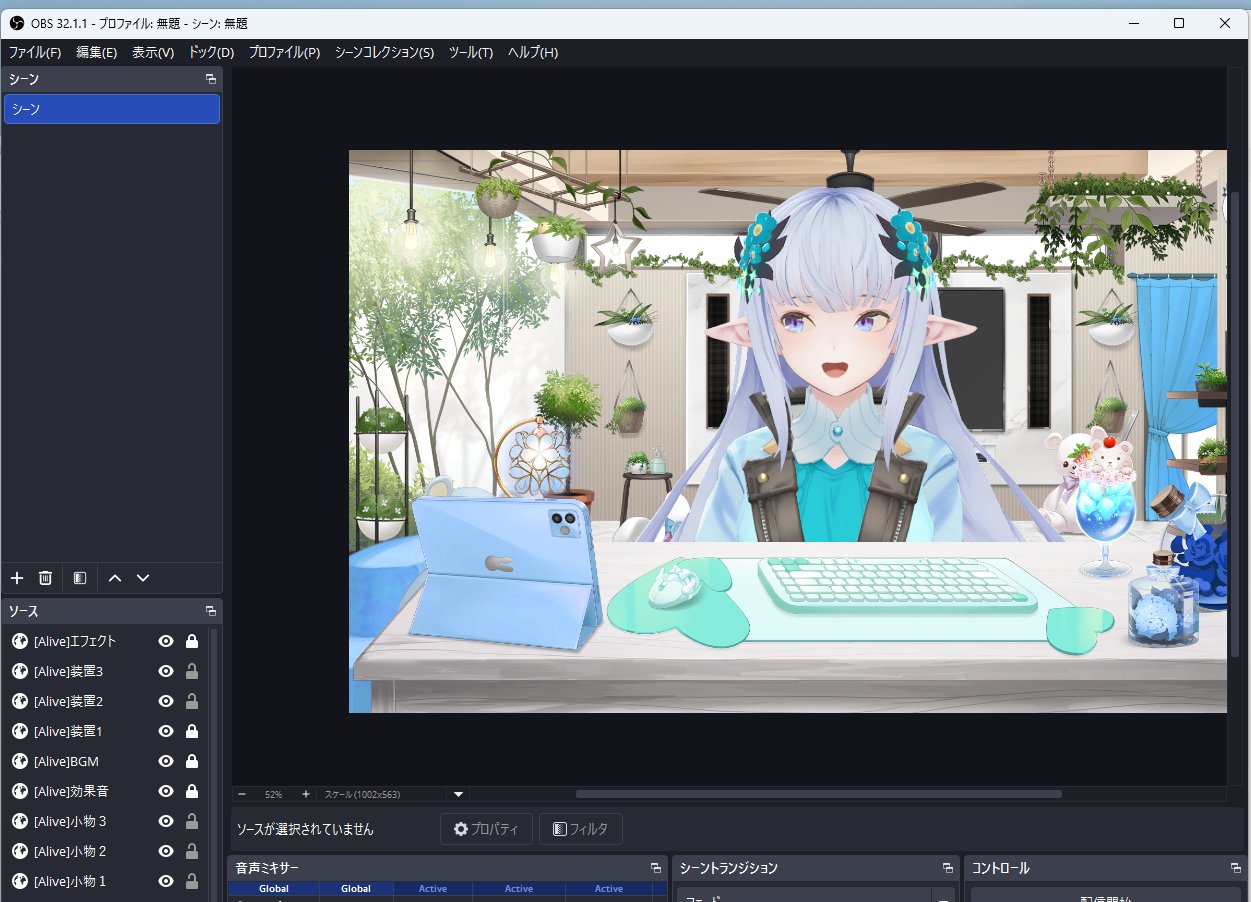
- Bring the Avatar Viewer into OBS as a streaming source (optional)
What You Need
- VRC Avatar Viewer (main application)
- Motion Capture for VRC Avatar Viewer (Capture App / distributed on BOOTH)
- Webcam (if you want to move your body and arms. 720p or higher recommended)
- Face ID-compatible iPhone or iPad Pro + iFacialMocap (if you want to move only facial expressions and head without a webcam, or to improve facial expression accuracy)
- Streaming software such as OBS Studio (optional)
VMC / UDP→ [Avatar Viewer] →Spout / Transparent Window→ [OBS][iPhone (iFacialMocap)] → [Capture App] →
VMC / UDP→ [Avatar Viewer]
- This guide first explains a configuration where everything runs on a single PC. If you want to separate the streaming PC and capture PC, there is a supplement at the end of Step 2
- If you use only iFacialMocap without a webcam, you can move your avatar's facial expressions, head movements, and gaze. A webcam is required for body, arm, and lower body movements
- For information about installing the Avatar Viewer itself and loading avatars, please first refer to From Avatar Export to Display
Prepare the Capture App
The Capture App is a Windows application that estimates body, arms, fingers, and facial expressions from webcam footage and transmits them externally via the VMC protocol. Even without a webcam, you can use iFacialMocap to transmit facial expressions, head position, and gaze.
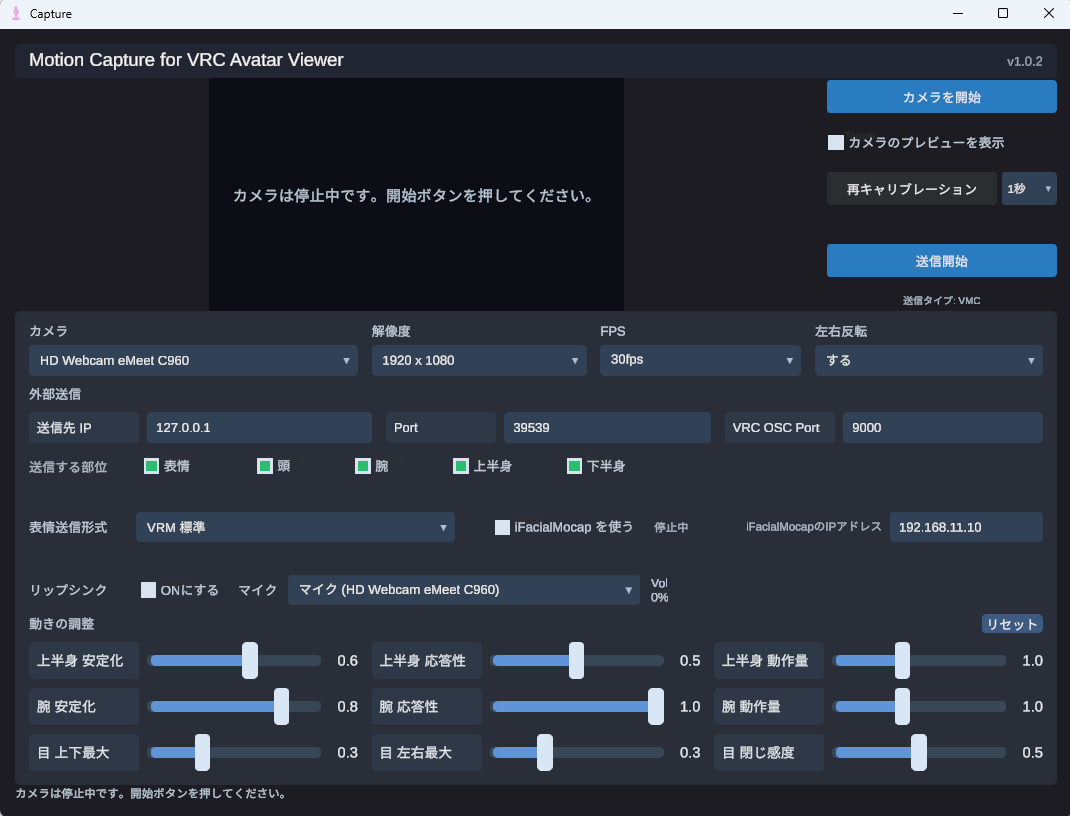
1-1. Download and Launch
- Download the Capture App ZIP from the BOOTH distribution page
- Extract the ZIP and double-click
Capture.exeto launch
1-2. Start the Webcam
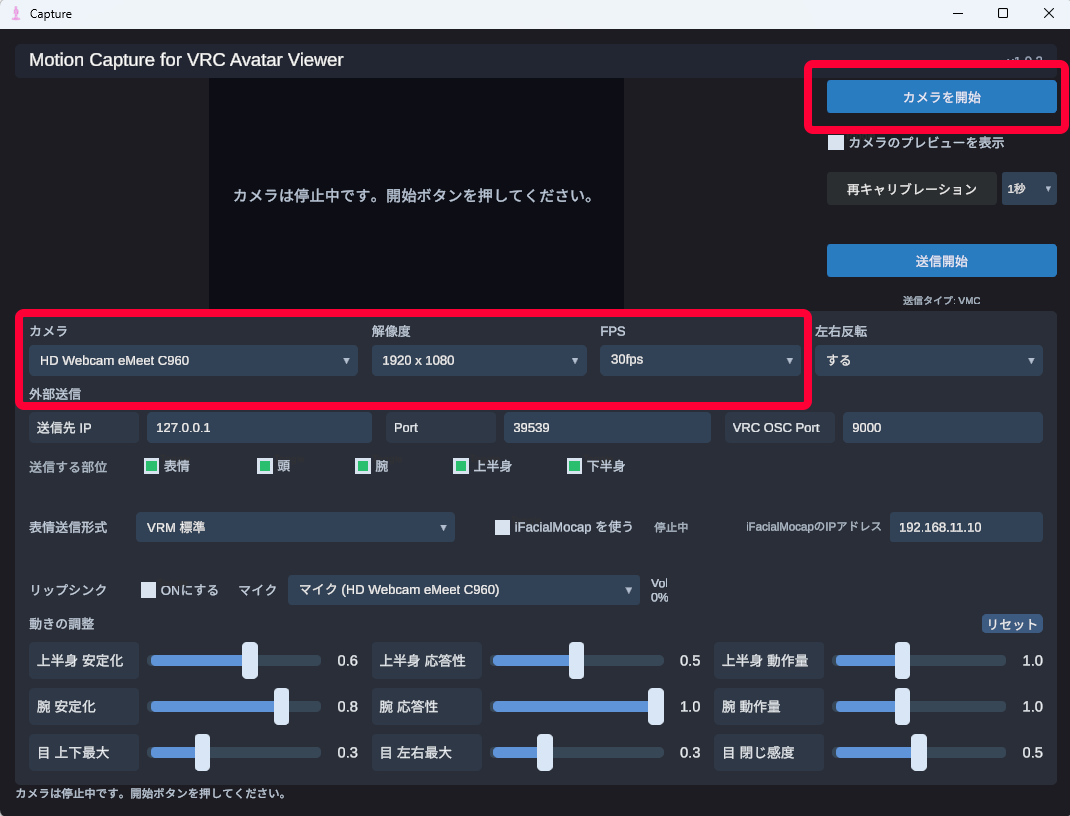
- Select "Camera", "Resolution", and "FPS"
- Click the "Start Camera" button
- Confirm that you appear in the preview
- Stand in front of the camera in a natural posture, as you will press "Initial Calibration" in Step 2
- Position yourself so that your upper body is visible in the frame.
- Keep the background as simple as possible, and ensure there is enough light for your face to be clearly visible
1-3. Use without Webcam (iFacialMocap Only)
If you don't have a webcam, select "No Camera (Use iFacialMocap)" from the camera dropdown. In this mode, you don't use the "Start Camera" button, and only transmit facial expressions, head direction, and gaze received from your iPhone.
- Launch iFacialMocap on your iPhone and note the IP address displayed on the screen
- In the Capture App, select "No Camera (Use iFacialMocap)" from the "Camera" dropdown
- Enter your iPhone's IP address in "iFacialMocap IP Address"
- Turn "Use iFacialMocap" ON
- When the status shows "Receiving", press "Initial Calibration"
- After calibration, press "Start Transmission"
- Facial expressions, head, and gaze can be obtained from iFacialMocap
- Arms, upper body, and lower body require a webcam. If using iFacialMocap only, focus on transmitting facial expressions and head
1-4. Adjust Movements
If movements don't look right, you can adjust them using the Motion Adjustment sliders at the bottom of the screen. Parameters are divided by section: upper body, arms, hands, and eyes.
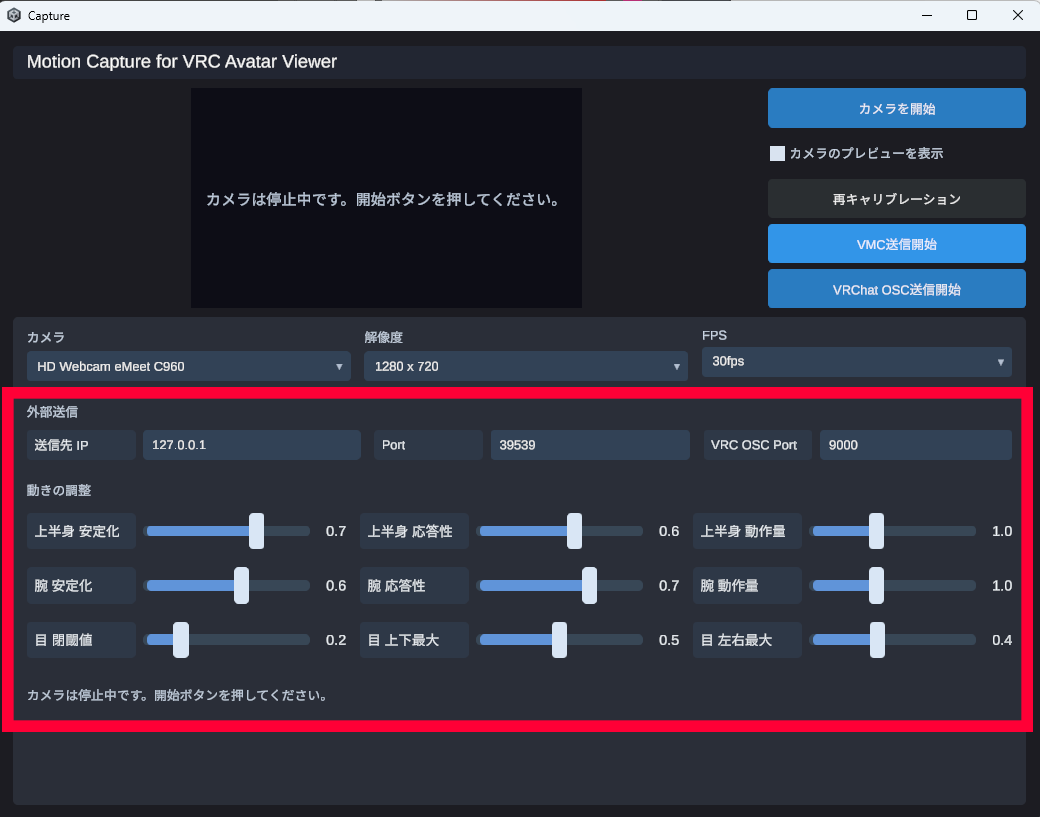
| Section | Parameter | Effect |
|---|---|---|
| Upper Body | Stabilization | Reduces jitter (higher values cause slower tracking) |
| Upper Body | Responsiveness | Tracking response to sudden movements (higher values make movements more agile) |
| Upper Body | Motion Amount | Magnitude of output movement (lower values are more subtle) |
| Arms | Stabilization | Reduces fine arm jitter (higher values cause slower tracking) |
| Arms | Responsiveness | Tracking response of arms to sudden movements (higher values make movements more agile) |
| Arms | Motion Amount | Magnitude of arm movement (lower values are more subtle) |
| Hands | Front/Back | Adjusts whether hands tend to move forward or backward from the body |
| Eyes | Motion Amount | Adjusts the magnitude of gaze movement |
| Eyes | Vertical Position | Adjusts the baseline position of gaze in the vertical direction |
| Eyes | Ease of Closing | Adjusts how readily blinking and eye closing occur |
| Eyes | Ease of Opening | Makes the avatar's eyes open more readily in the normal open state |
Settings are automatically saved when the app closes. The eye parameters affect gaze and blinking output regardless of whether you use a webcam or iFacialMocap for facial expressions.
1-5. When There's a Mismatch Between Human and Avatar Posture
Pressing the "Recalibrate" button retakes the reference posture after a countdown of the selected number of seconds. The first time it says "Initial Calibration", and from the second time onward it says "Recalibrate".
1-6. Select Body Parts to Transmit
Use the "Body Parts to Transmit" checkboxes in the External Transmission section to individually turn ON/OFF which body parts are reflected on your avatar. Body parts turned OFF will remain static in their default pose.
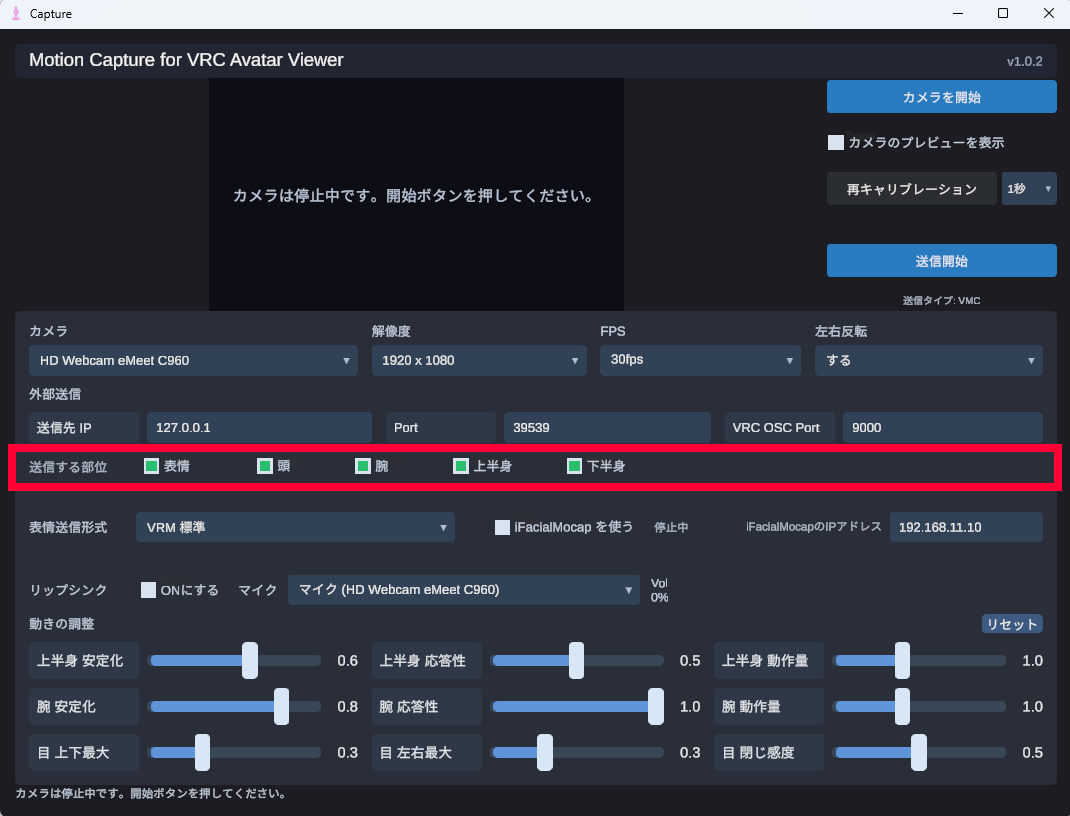
| Body Part | Description |
|---|---|
| Facial Expressions | Face tracking results including blinking, mouth, and gaze |
| Head | Head direction (neck rotation) |
| Arms | Arm and finger movements |
| Upper Body | Upper torso tilting, shoulder movements |
| Lower Body | Hip and leg movements |
- If streaming while sitting in a chair, turning OFF Lower Body can reduce misdetections of standing and sitting
- If using a different tool (such as VRCFaceTracking) for facial expression tracking, you can turn OFF Facial Expressions to avoid conflicts
- If using only iFacialMocap, you can turn ON Facial Expressions and Head, and turn OFF Arms, Upper Body, and Lower Body for clearer operation
1-7. Lip Sync
A feature that generates mouth movements (lip sync) from microphone audio. It responds faster than webcam face tracking, resulting in more natural mouth movements. This is useful for singing streams or streaming while wearing a mask.
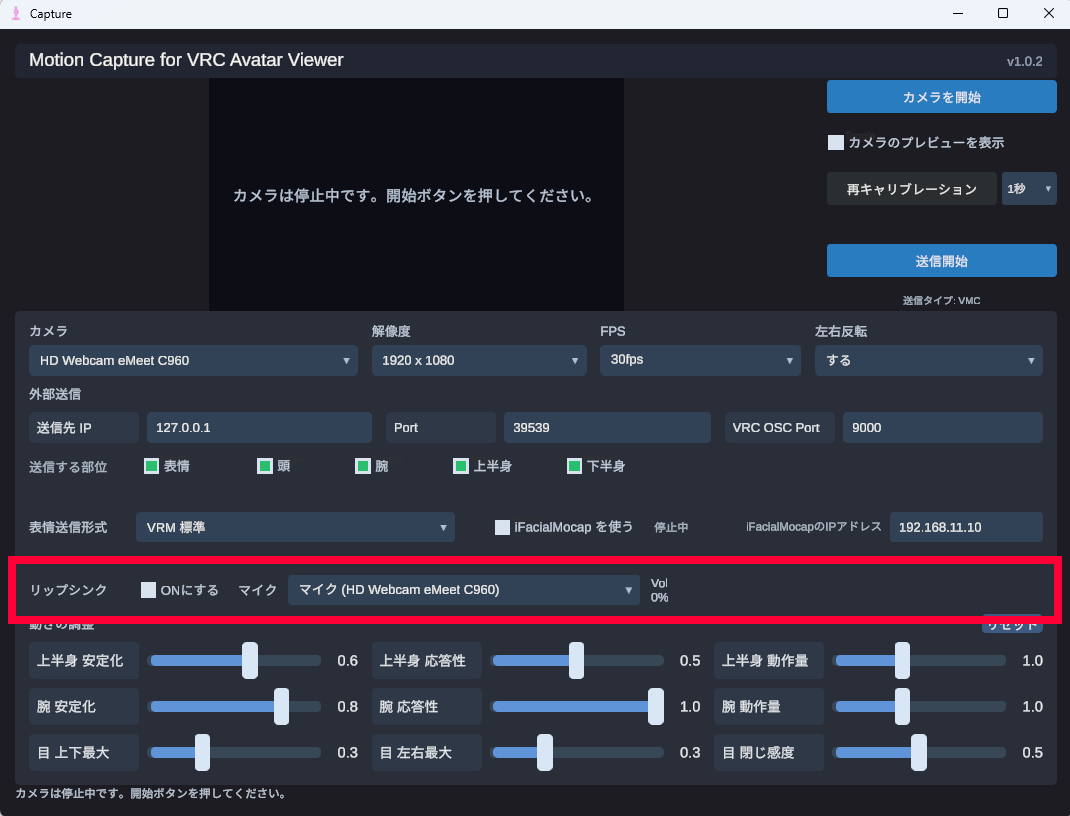
How to Use
- Turn ON the "Enable" toggle in the "Lip Sync" section
- Select the input device to use from the "Microphone" dropdown
- Speak and confirm that the volume meter next to it responds
- While Lip Sync is ON, microphone volume and vowel analysis results take priority over webcam mouth movements
- If the microphone is not responding, check Windows sound settings to confirm the input device is enabled
Integrate with Avatar Viewer and Animate Your Avatar
Motion is transmitted from the Capture App to the Avatar Viewer via the VMC Protocol (OSC over UDP). Simply enable reception on the Avatar Viewer side and specify the transmission destination on the Capture App side to integrate them.
2-1. Avatar Viewer Side: Start Reception in Streaming Mode
- Display your avatar in the Avatar Viewer
- Click the Streaming button in the toolbar
- If needed, open "Face Tracking" and set the type to match the Capture App's "Face Tracking"
- Confirm that the VMC Receive Port is set to
39539 - Press the "Start" button for reception
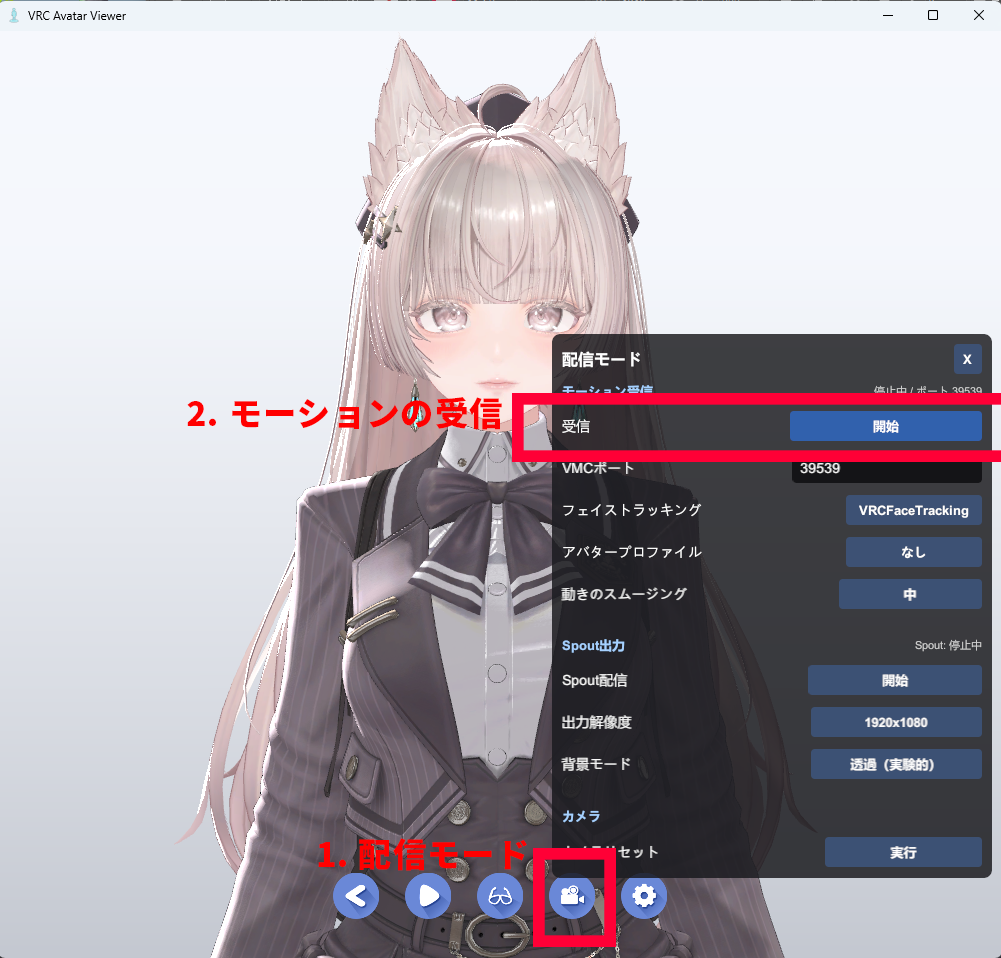
Main Items in the Streaming Panel
| Item | Description |
|---|---|
| IK | Turns arm position correction ON/OFF. It is OFF by default. If your wrists or arms point in unnatural directions, keep it OFF |
| Field of View | Adjusts the angle of view of the streaming camera. Smaller values give a flatter look suited to VTuber streaming; larger values give a wider angle |
| Zoom emphasis | Adjusts the strength of zoom changes in response to head forward/backward movement |
| Face Forward | Resets only the avatar's direction to face forward without moving its position |
| Camera View: Save / Restore | Saves the current streaming camera position and field of view, allowing you to return to the same composition later |
- Setting the face tracking type to VRCFT makes the Viewer side also use the VRChat OSC Receive Port in addition to VMC. You can normally keep it at
9000 - If another application like the VRChat client is using the same OSC port, reception may fail. In that case, change the port
2-2. Capture App Side: Start Transmission After Calibration
- Set the Capture App's "Transmission Destination IP" to
127.0.0.1and "VMC Port" to39539 - If using VRCFT, also set "VRC OSC Port" to the same value as the Viewer's VRChat OSC Receive Port (normally
9000) - Prepare to receive from your webcam or iFacialMocap
- Press the "Initial Calibration" button
- Wait for the countdown to finish and record your initial posture
- Press the "Start Transmission" button
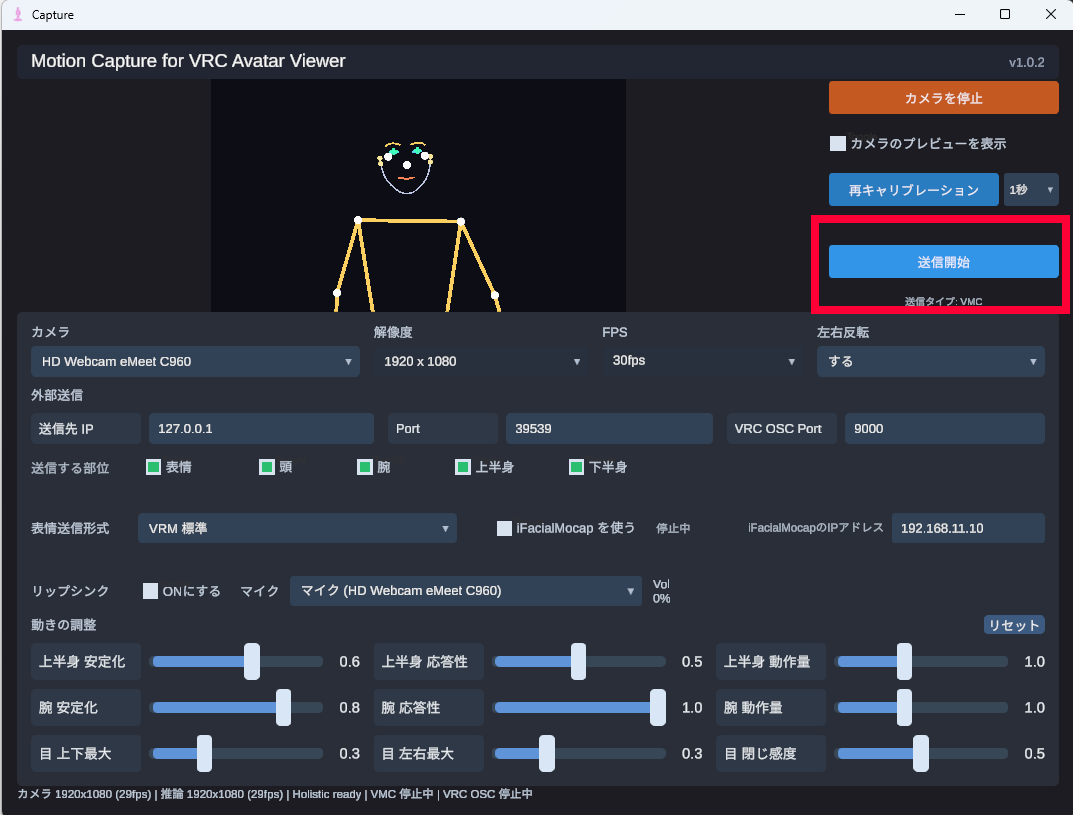
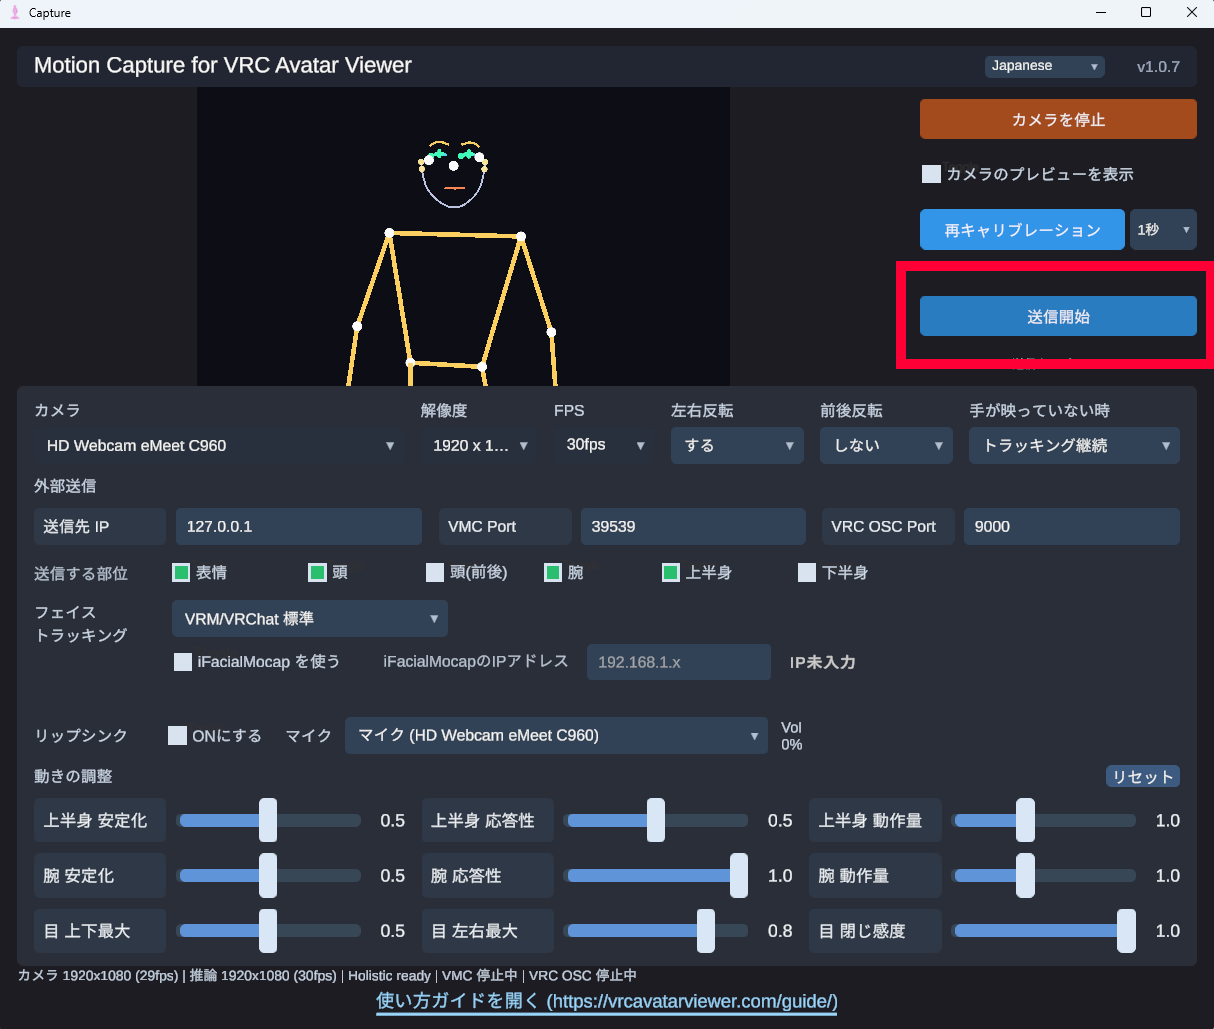
Your avatar will now begin moving in sync with your movements. If using iFacialMocap only, facial expressions, head, and gaze will be reflected.
- When using a webcam: The camera is active and initial calibration is complete
- When using iFacialMocap only: The camera is set to "No Camera (Use iFacialMocap)", iFacialMocap is Receiving, and initial calibration is complete
- When using iFacialMocap only, the "Start Camera" button is disabled. This is expected
- Below the "Start Transmission" button, a caption showing "Transmission Type: VMC" or "Transmission Type: VMC + VRChat OSC" appears. This indicates your current transmission protocol
- The caption changes based on your selection of facial expression transmission format (VRM Standard / Perfect Sync / VRCFT). Only when VRCFT is selected does face tracking data flow to both VMC and VRChat OSC
- For more details about facial expression tracking, see the Facial Expression Tracking or VRCFaceTracking Integration guides
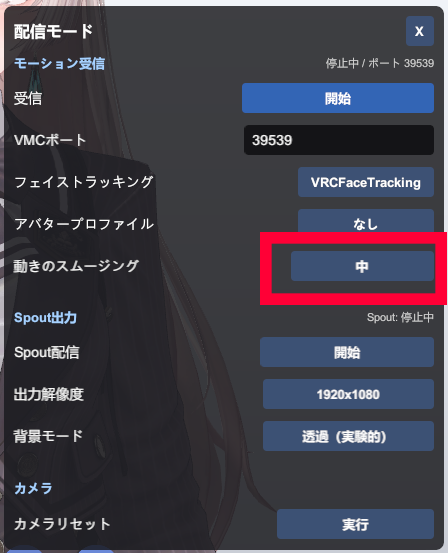
- If movements appear stiff, open "Motion Smoothing" in the Viewer's streaming mode to adjust smoothing for head, body, hands/arms, gaze, blinking, eyebrows, and mouth individually
- Moving the slider to the right makes movements smoother and reduces trembling. However, this increases latency
- When using VRCFT, facial expression smoothing is disabled
2-3. When Movements Don't Work Properly
If you can't start transmission, the avatar or its facial expressions don't move, iFacialMocap stays waiting for a connection, or movements freeze, see Not Working Properly (FAQ) for things to check.
2-4. When You Want to Transmit from a Different PC
If you want to use separate PCs for capture and streaming, set the Capture App's "Transmission Destination IP" to the IP address of the Avatar Viewer PC. Allow UDP 39539 reception in the Avatar Viewer PC's firewall. We recommend keeping both PCs on the same LAN with a wired connection.
Facial Expression Tracking
Facial expression tracking is covered in separate guides.
- Facial Expression Tracking (Webcam / iFacialMocap) How to obtain facial expressions using a webcam or iPhone (iFacialMocap) with the Capture App
- VRCFaceTracking Integration How to send facial expressions directly from VRCFaceTracking, the de facto standard for VRChat face tracking, to the Viewer app (Quest Pro / Vive Facial Tracker, etc.)
Bring Your Avatar into OBS Studio
For how to bring the Avatar Viewer into OBS Studio as a streaming source (Spout2 output / transparent background mode + Window Capture), see Output to OBS.